How to Create an Automated Webinar to Attract High-Paying Coaching Clients, Part 3: Creating Your Webinar Video
Tuesday July 26, 2016
If you want to attract more clients by creating an automated webinar, but you aren't very tech-savvy, today's blog post is for you.
In the last two blog posts, I told you how to create the script for your webinar, and how to tell your story in the webinar in a way that builds connection, interest and trust.
Today, I'm going to tell you how to record the audio for your webinar, combine it with slides, and turn it into a video.
How to record your webinar audio:
My favorite software for recording and editing audio is Audacity. You can download it here at no cost.
I recommend it over the Sound Recorder program that comes with Windows, because the Sound Recorder program creates .wma files, which some audio editing programs can’t use by default. If you want to use .wma files, you may need to install an additional FFmpeg library into your audio editor.
All in all, recording directly into Audacity is far simpler than having to use two programs, and needing to install additional software into one of those programs.
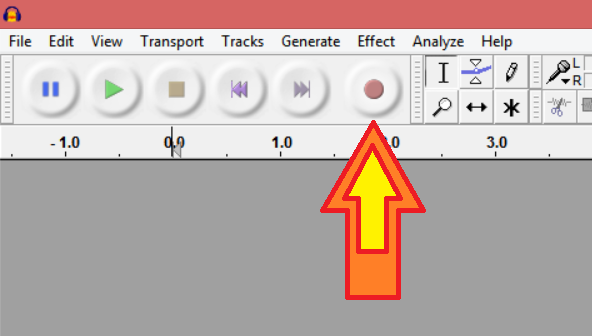
Once you’ve installed Audacity, just press the “record” button and start talking.
In the last two blog posts, I told you how to create the script for your webinar, and how to tell your story in the webinar in a way that builds connection, interest and trust.
Today, I'm going to tell you how to record the audio for your webinar, combine it with slides, and turn it into a video.
How to record your webinar audio:
My favorite software for recording and editing audio is Audacity. You can download it here at no cost.
I recommend it over the Sound Recorder program that comes with Windows, because the Sound Recorder program creates .wma files, which some audio editing programs can’t use by default. If you want to use .wma files, you may need to install an additional FFmpeg library into your audio editor.
All in all, recording directly into Audacity is far simpler than having to use two programs, and needing to install additional software into one of those programs.
Once you’ve installed Audacity, just press the “record” button and start talking.
"‹If your computer is a bit slow, you may need to wait a couple seconds after pressing “record”. Once a track appears and the cursor starts moving, you can start to speak.
"‹
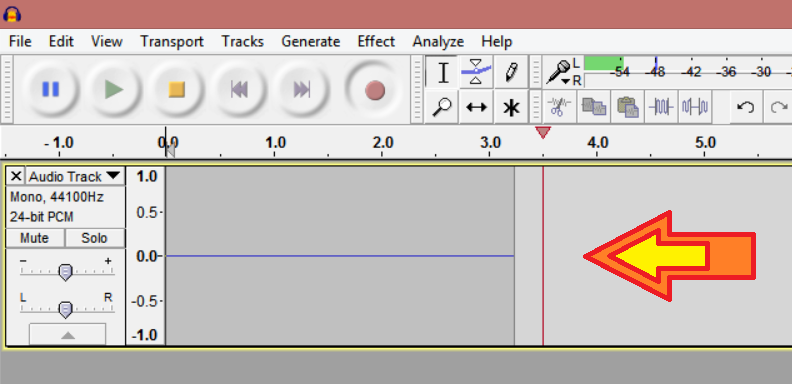
Be sure to speak slowly and clearly. I recommend talking for about 15 seconds at your normal pace, and then pressing pause and listening to the recording. If the recording is easy to hear, and you can make out the words effortlessly, you’re talking at a good pace.
But if your voice sounds rushed, and the words aren’t completely distinct, then you’ll want to slow down. If your audience has to strain to catch your words, they won’t enjoy listening to your webinar, and they're likely to leave partway through.
Unless you’re a very expressive speaker, you’ll also want to exaggerate the emotions in your voice a bit. Otherwise, it can come out sounding flat, boring and monotonous.
Injecting an extra dose of enthusiasm and happiness into your voice may feel unnatural at first, but it will make the recording a lot more engaging for your audience.
When you want to pause recording, you may want to press “pause” instead of “stop”. If you press “stop”, then when you resume recording, it will create a new track below the one you were already using.
This isn’t disastrous, but it does mean that instead of having a single track to work with, you can end up with a big stack of tracks if you frequently stop and resume.
If you do accidentally create an extra track, and you want to move it to the original track, just double-click on the track you want to move in order to select it, then press “control” and “c” at the same time to copy it.
Place your cursor on the track you want to add the moved sound clip onto, at the point at which you want to add it then press “control” and “v” to paste it. Then delete the unwanted extra track.
You don't HAVE to have everything in the same track, but it can make it easier to visually keep track of everything if you don't have a huge stack of separate tracks.
It’s important to note that you cannot edit the audio while playing, paused or recording. If you want to edit something, you’ll have to press “stop”.
How to edit your webinar audio:
When editing your audio, there are two features that you’ll probably find especially handy:
1. Change tempo
2. Amplify
Change tempo
If you mostly like the way a segment of audio sounded, but it was a little too fast, you can use the “change tempo” effect to slow it down without creating the goofy-sounding pitch-lowering that you’d get by simply slowing down the audio.
To do this, choose the Selection Tool, or the button with an I-shaped symbol located directly below the Analyze tab in the navigation. Use it to highlight the section of audio that you want to slow down, the same way you’d highlight text in a text processor.
Then, in the navigation bar, press Effect to get a drop-down menu, then select Change Tempo. A small window will pop up, enabling you to choose the percentage by which you want to slow down the selection, and to listen to a preview of the slowed audio.
Amplify
This feature is also located in the Effect drop-down menu, and it allows you to make the audio louder or quieter.
You shouldn’t have to change it by much; four to six dB is usually plenty enough when I need to tweak something, so don’t hurt your ears by increasing it by the tens of dB that it sometimes recommends.
If your microphone isn’t great, you can also use this or the Silence Audio feature to quiet the static that may be audible between sentences.
Cutting out mistakes
If you make a mistake, cough or sneeze, fart spectacularly, or otherwise have a sound in the track that you don’t want to include in the final product, all you have to do is highlight it and press “delete”, the same way you would in a text processor.
Creating the audio file
Once you’ve edited the recording to your satisfaction, click “file”, then select “export audio” from the drop-down menu. This is how you turn the project into an audio file. I recommend exporting as an mp3 file, since those are compatible with a wide range of programs and devices.
If you have multiple tracks in your Audacity project, the "export" feature will combine them into a single track, so you don't have to worry about reducing it to one track yourself.
How to turn it into a video:
"‹If you don't already have a video editing program, you can get Windows Movie Maker for free here.
To create the slides for your webinar, first open Paint, or whatever picture editing program you use, and create a white image 1920 pixels wide and 1080 high.
Then, open Movie Maker and click on "Add videos and photos". This will open a window with your files in it. Navigate to the place where you saved your white slide image, select it, and click "open".
"‹
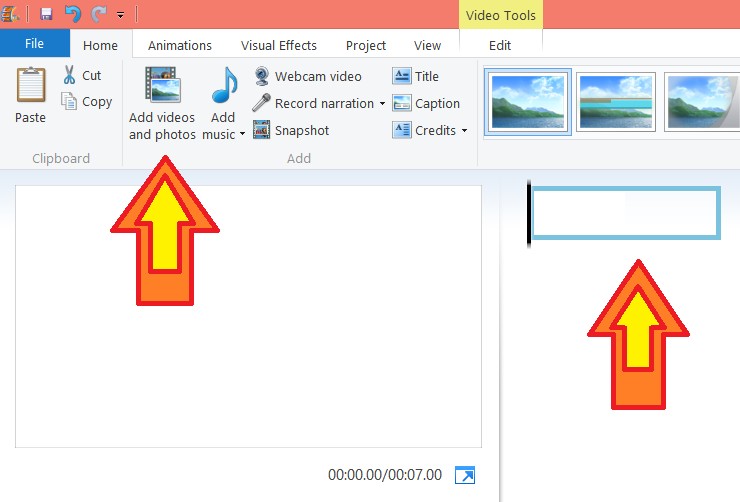
You can now see the slide image in your Movie Maker project. Select the image, press "control" and "c" simultaneously, then press "control" and "v" repeatedly to paste the image several times. You now have several slides to work with.
To add text, use the "caption" feature. You can change the size, font and color of the text, as well as the outline size and color.
You can also choose how long the caption stays on the screen by adjusting the "text duration", or by pressing "o" at the point where you want the slide with the caption on it to end.
To add your recording to the project, click "Add music", then add the audio file to the project the same way you added the slide image.
When you're done, click "File", then select "save movie". It will give you a list of settings you can choose from for the final product. I usually default to "recommended for this project".
Once you've selected the setting, a window will pop up, allowing you to name the video file and choose where it's saved. Once you've chosen the name and location, press "save", and it will create your video file.
Congratulations! You have now created the video for your automated webinar.
Need more help to get your webinar up and running?
I'd be happy to give you a hand! Just send me an email at [email protected], and I'll get in touch so we can discuss your goals and see if we're a good fit.

Stephanie
Stephanie is a writer and coaching program design specialist. She helps coaches to create and sell life-changing coaching programs, so they can help more people, make more money, and have more time freedom.
Categories
Recent Posts
Popular Tags
leadership Bio Blogging Movie Maker Resume Website design Product developmet Creativity SEO Public speakingArchives
Subscribe
